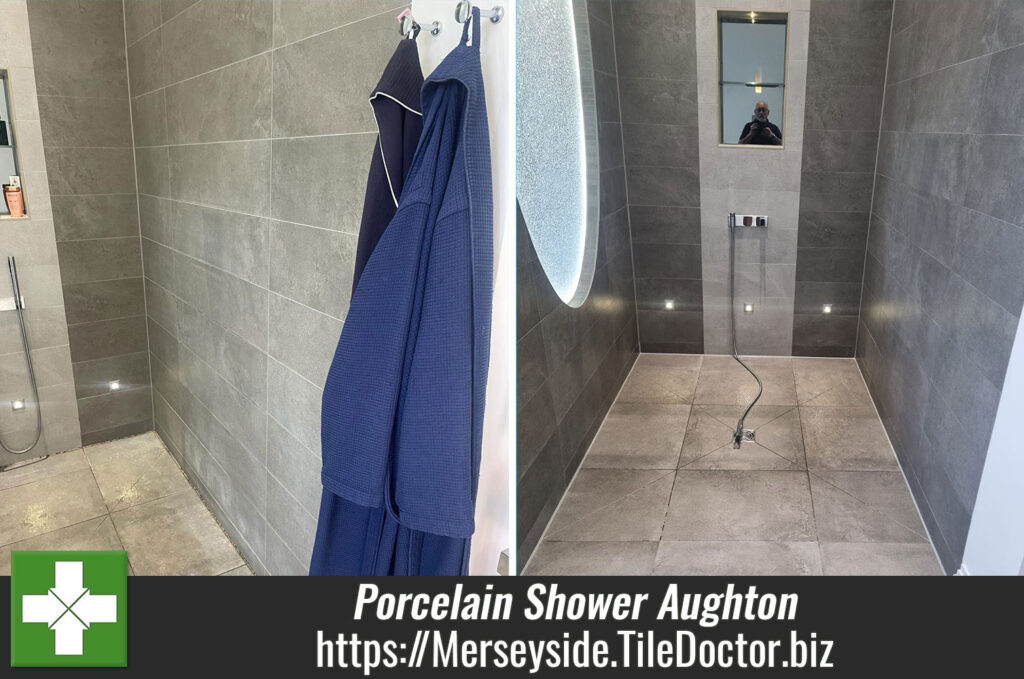
Grout Cleaning

Welcome to my Work History archive where you will find detailed examples of the cleaning and renovation of Grout carried out in North Wales

Cleaning and Renovating Grout

The top layer of grout is porous and can absorb grease, dirt and limescale. Spillages such as wine, lemonades or greasy substances will cause marks and patches in the joints in the floor. Grout between wall-tiles particularly in damp areas like bathrooms will become dirty and unattractive as a result of Mould, Mildew and Limescale.

Mould is one of the most unsightly problems, which usually starts off in the wettest area of the room, this could be the bottom of the shower or bath, then starts to spread and if left unchecked could cover a large area of the wall.

Another common issue we find is a problem known as Grout Haze or Grout Smearing where a thin layer of grout has been left to set on the surface of the tile. Once grout has set it is difficult to remove.

Discolouration of grout joints in bath or shower areas due to continued use of acid formulated shampoos and soaps. This causes yellow orange and pink stains to the grout over even a short period of time. Whilst Grout Joints can be cleaned, badly stained grout may need to be re-coloured.

Protecting your grout in advance with a sealer will prevent most of these issues and although relatively unknown in the UK, protection awareness is growing. Sealing forms an invisible barrier between the grout and the surface, this will then protect your investment for years to come.

We have solutions for all the problems listed above and below you will find detailed examples of work we have carried out in the past to resolve many of these issues. It should give you some idea of what’s involved and what can be achieved with the right techniques and products.


Limestone Hallway Floor Polishing Ainsdale

Polishing a Limestone Hallway Floor in Ainsdale

A homeowner from Ainsdale was in touch recently regarding the Limestone floor in their hallway which needed attention. The floor had been laid six years prior and over that time its appearance had degraded significantly losing its colour and almost turning white in places.

Limestone Floor Ainsdale Before Cleaning Polishing

I visited the property to survey the floor and it was clear to me that the original sealer and polish had long since worn off. Additionally, I suspect they may have been using the wrong product to clean the floor with.

I recommended giving the floor a deep clean to remove ingrained dirt and what was left of the original sealer and then polishing the stone with burnishing pads to bring up the appearance of the stone and then finishing with the application of a protective sealer. Happy with my quote a date was set for the work to start.

Cleaning and Polishing a Limestone Tiled Floor

On arrival the first step was to give the floor a general clean with a focus on cleaning the grout lines and removing any grit from the floor. I used a 1:4 dilution of Tile Doctor Pro-Clean which is an alkaline tile cleaning product that is safe to use on grout and stone. The cleaning solution was applied by sponge mop and left to soak in for fifteen minutes before being scrubbed in along the grout line using a stiff narrow brush to get them really clean. Once done the floor was then rinsed with clean water and the now soiled cleaning solution removed with a wet vacuum.

The next step was to use a set of Tile Doctor burnishing pads to polish the stone back to a deep shine. The pads which are encrusted with industrial diamonds are applied with a rotary floor buffer in sequence from coarse to extra fine. The first pad has a Coarse 400 grit which is applied with only water for lubrication, removes minor scratches, sealers, and the top surface dirt. Working in small areas, I applied the pad across the Limestone, rinsing in between and picking up the soiled solution with a wet-vac machine. I then repeated this same procedure with the Medium 800 grit pad which is the first stage polishing pad again rinsing with water after use. The next two pads are a Fine 1500 grit and Extra Fine 3,000 grit which really build up a high-quality polish on the stone.

Sealing a Polished Limestone Tiled Floor

The floor was left to dry off fully overnight and I returned the next day to seal the Limestone first checking with a damp meter that the stone was dry. The Limestone had some lovely brown colours so I had recommended we use Tile Doctor Colour Grow to seal the floor as this brings out the colour and it certainly didn’t disappoint. This sealer is an impregnating sealer that works under the surface by occupying the pores in the stone thus preventing dirt from becoming ingrained there. This ensures dirt remains on the surface where it can be easily removed with regular cleaning.

Limestone Floor Ainsdale After Cleaning Polishing

A couple of floor fans were used to help speed up the drying process and after about an hour the floor gently buffed with a White pad to bring up the shine even further. Once complete the floor looked amazing.

For the aftercare cleaning of a polished stone floor like this we recommend using Tile Doctor Stone Soap. It’s a gentle yet effective cleaner that helps maintain the patina and won’t damage the sealer ensuring it lasts a long time.


Professional Limestone Floor Polishing in Merseyside

Polishing a Limestone Hallway Floor in Ainsdale Read More »

Marble Floor Tile Polishing Thornton

Cleaning and Restoring the Polish on a Marble Tiled Floor in Thornton

A client in the Merseyside village of Thornton asked me to come over to see what could be done about their Marble tiled floor which ran from the hallway into the kitchen and dining room. Over the years the Marble had lost its polished appearance which is not uncommon with polished stone as the shine does wear down with use.

Marble Floor Tiles Before Cleaning Thornton

It’s worth mentioning at this point that Tile Doctor offer a maintenance plan for owners of these types of floors whereby we pop in once a year for a few hours to bring up the polish on the floor and top up the sealer. Before I could offer that option though the floor needed to be stripped back, burnished and re-sealed.

Marble Floor Tiles Before Cleaning Thornton

Cleaning a Marble Polished Tiled Kitchen and Hallway Floor in Thornton

To start I gave the floor a wash with Tile Doctor Pro-Clean which was left to soak into the tile and grout for ten minutes before scrubbing it in with a black pad fitted to a rotary floor machine. Then a little water was added to the floor and the grout lines scrubbed by hand using a stiff brush. The dirt was then removed with a wet vacuum.

Marble Hallway Tiles During Cleaning Thornton

The next job was to add extra weight to the floor machine to improve contact with the Marble tiles during the next process of burnishing which involves the application of a set of diamond pads of increasingly finer grits. The first burnishing pad used was a 400-grit which removes light scratches and old sealers; water is used for lubrication and the pad is run over each of the tiles four times making sure to cover the full tile. Once done the floor is then rinsed off with water and the soiling generated is extracted with a wet vacuum.

This process is then repeated with a finer 800-grit pad and then a 1500-grit pad which further brings up the polish on the tile. The floor was rinsed and dried by wet vacuum and then left to dry off completely overnight.

Sealing Marble Polished Tiled Kitchen and Hallway Floor

The next day I applied the last Tile Doctor Burnishing Pad which is a very fine 3000-grit pad, this time applied with only a spray of water which is a process we refer to as a spray burnish. This last pad builds on the polished appearance of the marble really bringing up the shine.

The final step was to seal the Marble floor using several coats of Tile Doctor Colour Grow which is an impregnating sealer that protects the tiles and improves colour. Once dry the floor was given a buff with a White buffing pad leaving a deep shine to the floor.

Marble Floor Tiles After Burnishing Thornton

Once complete the floor looked fantastic, the grout was much cleaner and the Marble had a deep shine you could see your reflection in. The client was delighted with the outcome and I’ve made a note to get in touch with them next year about a maintenance visit. In the meantime, I’ve recommended they clean the floor with Tile Doctor Stone Soap which is ideal for maintaining the patina on polished stone floors.


Professional Restoration of a Polished Marble Tiled Hallway and Kitchen in Merseyside

Cleaning and Restoring the Polish on a Marble Tiled Floor in Thornton Read More »

Porcelain Tiled Wall Grout Recoloured Maghull Liverpool

Grout Colouring Different Shades of Grey Grout in Maghull

Recently I paid a visit to a customer in Maghull just North of Liverpool who needed their recently installed bathroom grout colouring. It was a recent installation however it turns out that tiler had used two different bags of grout to do the grouting so there was a slight difference in the shading.

It was an unfortunate situation however raking out grout so it can be re-done carries the risk of chipping the tiles and these were an expensive variety of porcelain. The solution was to recolour all the grout as close to the original as possible using an epoxy grout colourant. Tile Doctor have ten different colours available including three different shades of grey so finding a suitable colourant was not going to be an issue.

Porcelain Tiled Bathroom Wall Before Grout Colouring Maghull Liverpool

The photos on this page haven’t really captured the difference original grouting very well but you can see the overall difference.

Grout Colourant Application

Firstly, I sprayed the grout with Grout Colourant Pre-Treater which is slightly acidic cleaning product that washes the grout and also being acidic etches it to make a better bond with the colourant. Once the Pre-Treater had been scrubbed into the grout it was rinsed off and left to dry.

Once dry the Grout Colourant was painted onto the grout with a small brush wiping away any excess from the surface of the Porcelain tile with a wet wipe as I progressed. The colourant dries very quickly so you can apply a second coat shortly after if you need to but it wasn’t necessary in this case.

Porcelain Tiled Bathroom Wall During Grout Colouring Maghull Liverpool

The Tile Doctor range of grout colourants have the added advantages of forming a barrier over the grout thereby preventing staining, discolouration and making future grout cleaning very easy.

Fortunately, the tiles were of a reasonably large format which reduces the number of grout lines so it didn’t take too long to complete the whole bathroom. Once dry the whole bathroom had the consistent shade of grey grout much to delight of my customer.

Porcelain Tiled Bathroom Wall After Grout Colouring Maghull Liverpool


Professional Grout Colourant Application in Porcelain Tiled Bathroom Liverpool

Grout Colouring Different Shades of Grey Grout in Maghull Read More »

Terracotta Tiled Kitchen Floor Renovated Formby

Cleaning a Large Terracotta Tiled Floor in Formby

We were asked to quote for the cleaning of a large Terracotta tiled floor in at a property in Formby which consisted of a Kitchen/Diner and Conservatory. The client reported that the floor was grubby and had lost its shine so I organised a visit to the property to survey the floor and work out a solution for them.

Terracotta Tiled Floor Before Renovation Formby
I always prefer to arrange a site visit so I can assess the work required and come up with a more accurate quote should the client decide to go ahead. I’ve seen floors in worse condition and the photos below on this page don’t highlight the problems that much, but it was clear to me that dirt was penetrating the pores of the tile making difficult to keep clean.

Terracotta Tiled Floor Before Renovation Formby
I carried out a test clean on a small area of tiling which came up very well. The client was suitably impressed and was happy to go ahead with the quote which would take two days, one to clean and one to apply a fresh protective sealer.

Cleaning Terracotta Tiled Kitchen Diner and Conservatory Floor

On day one the first job was to spray the floor with Tile Doctor Wax Away which is designed to remove the wax and old polish that was previously in place. This was left to dwell and soak into the tile and grout for twenty minutes and was then scrubbed in with a weighted floor buffer fitted a black pad and lubricated with water.

The grout lines were hand scrubbed with a wire brush and the resulting slurry was then removed with a wet vacuum. Once done the floor was inspected and any further areas were spot treated as required.

When I was satisfied the Terracotta tile and grout were as clean as they could be I gave the floor a final rinse with water to remove any trace of cleaning products and dried the floor as much as possible using the wet vacuum. The floor was then left to dry off overnight.

Sealing a Terracotta Tiled Kitchen Diner and Conservatory Floor

The following morning, moisture readings were taken from the floor to make sure it was dry enough for sealing. The readings were satisfactory so we began the process of applying the sealer.

For this floor Tile Doctor Seal and Go was applied using a paint pad leaving each coat to dry before applying the next. Seal and Go is a water-based sealer that results in a pleasant low sheen finish that’s ideal for Terracotta floors, it took seven coats of sealer to fully seal the floor.

Terracotta Tiled Floor After Renovation Formby
The clean floor and new subtle shine went down well with our client who was over the moon with the appearance. Before leaving we discussed how to maintain the floor for which we recommend the use of Tile Doctor Neutral Tile Cleaner. This product is pH neutral and will not damage the newly applied seal unlike some of the stronger regular household cleaners on the market. Kitchens and Conservatory floors tend to get a lot of use so it’s worth having the right cleaning regime in place to keep it in great condition.


Professional Renovation of a Large Terracotta Floor in Merseyside

Cleaning a Large Terracotta Tiled Floor in Formby Read More »

Granite Patio Renovated in Mawdesley Ormskirk

Removing Cement Residue from an Amazing Granite Patio in Mawdesley

We were contacted by a business owner in Mawdesley near Ormskirk who had recently had a large Granite Patio installed. Unfortunately, the installer had left the patio covered in cement grouting stains and residue and as you can imagine he was not happy about it.

Granite Patio Before Renovation Mawdesley Ormskirk

This is something we often get asked to resolve and you may here it referred to as Hazing or Smearing. The solution depends on the surface material and can normally be removed using an acidic cleaner such as Tile Doctor Grout Clean-up or Acid Gel. However, in this case the surface of the stone looked really dull and marked with lines and what appeared to be boot marks. I decided the best solution would be to use a set of diamond pads to grind off the top layer of stone to reveal a new surface and then to polish it.

Granite Patio Before Renovation Mawdesley Ormskirk

Resurfacing a Large Granite Patio in Mawdesley

To resurface the Granite, I used a weighted buffing machine and a set of coarse stone resurfacing pads. The extra weight was needed to ensure a good contact with the stone and the process commenced with a very coarse 100 grit pad to remove the damage using only water for lubrication.

The pad was run each Granite slab around three times generating a lot of residues in the process. A wet vacuum was used to remove the residue and with it being such a large patio it took some time before that was completed and we could move onto the next pad.

Granite Patio During Renovation Mawdesley Ormskirk

Once done the process was repeated with a 200-grit to renovate the surface after using the coarse pad. Again, only water was used and the whole area was rinsed and extracted to remove the residue. This action removed all the damaged surface material and was followed by the application of a very fine 3000-grit burnishing pad to give the patio a nice sheen.

Sealing a Large Granite Patio in Mawdesley

Fortunately, I had picked a good window in which to do the work (thanks to the BBC and Carol Kirkwood) and the weather remained dry. This was important as I was able to return the next day and prepare the Granite for sealing.

First, I applied a product called Tile Doctor Stone Oil to the Granite, this seeps into the pores of the stone giving it a rich dark colour improving the overall appearance and integrity. This was then locked in with an application of sealer which for this patio I used Tile Doctor Colour Grow. There are a few reasons I chose this product including the fact that its breathable which is important when dealing with external stone and it contains a colour enhancer which brings out the natural colours in the Granite.

Granite Patio After Renovation Mawdesley Ormskirk Granite Patio After Renovation Mawdesley Ormskirk

My client was very impressed with the transformation and relieved we had managed to put the life back in what was a very expensive patio. I’m please to say we subsequently asked to work on two more patios and different stone floors at the same property.

Granite Patio After Renovation Mawdesley Ormskirk


High Quality Transformation of a Large Granite Patio Near Ormskirk

Removing Cement Residue from an Amazing Granite Patio in Mawdesley Read More »

=================================

Merseyside Tile Doctor

================================= Read More »

Scroll to Top