Colour Grow

Limestone Hallway Floor Polishing Ainsdale

Polishing a Limestone Hallway Floor in Ainsdale

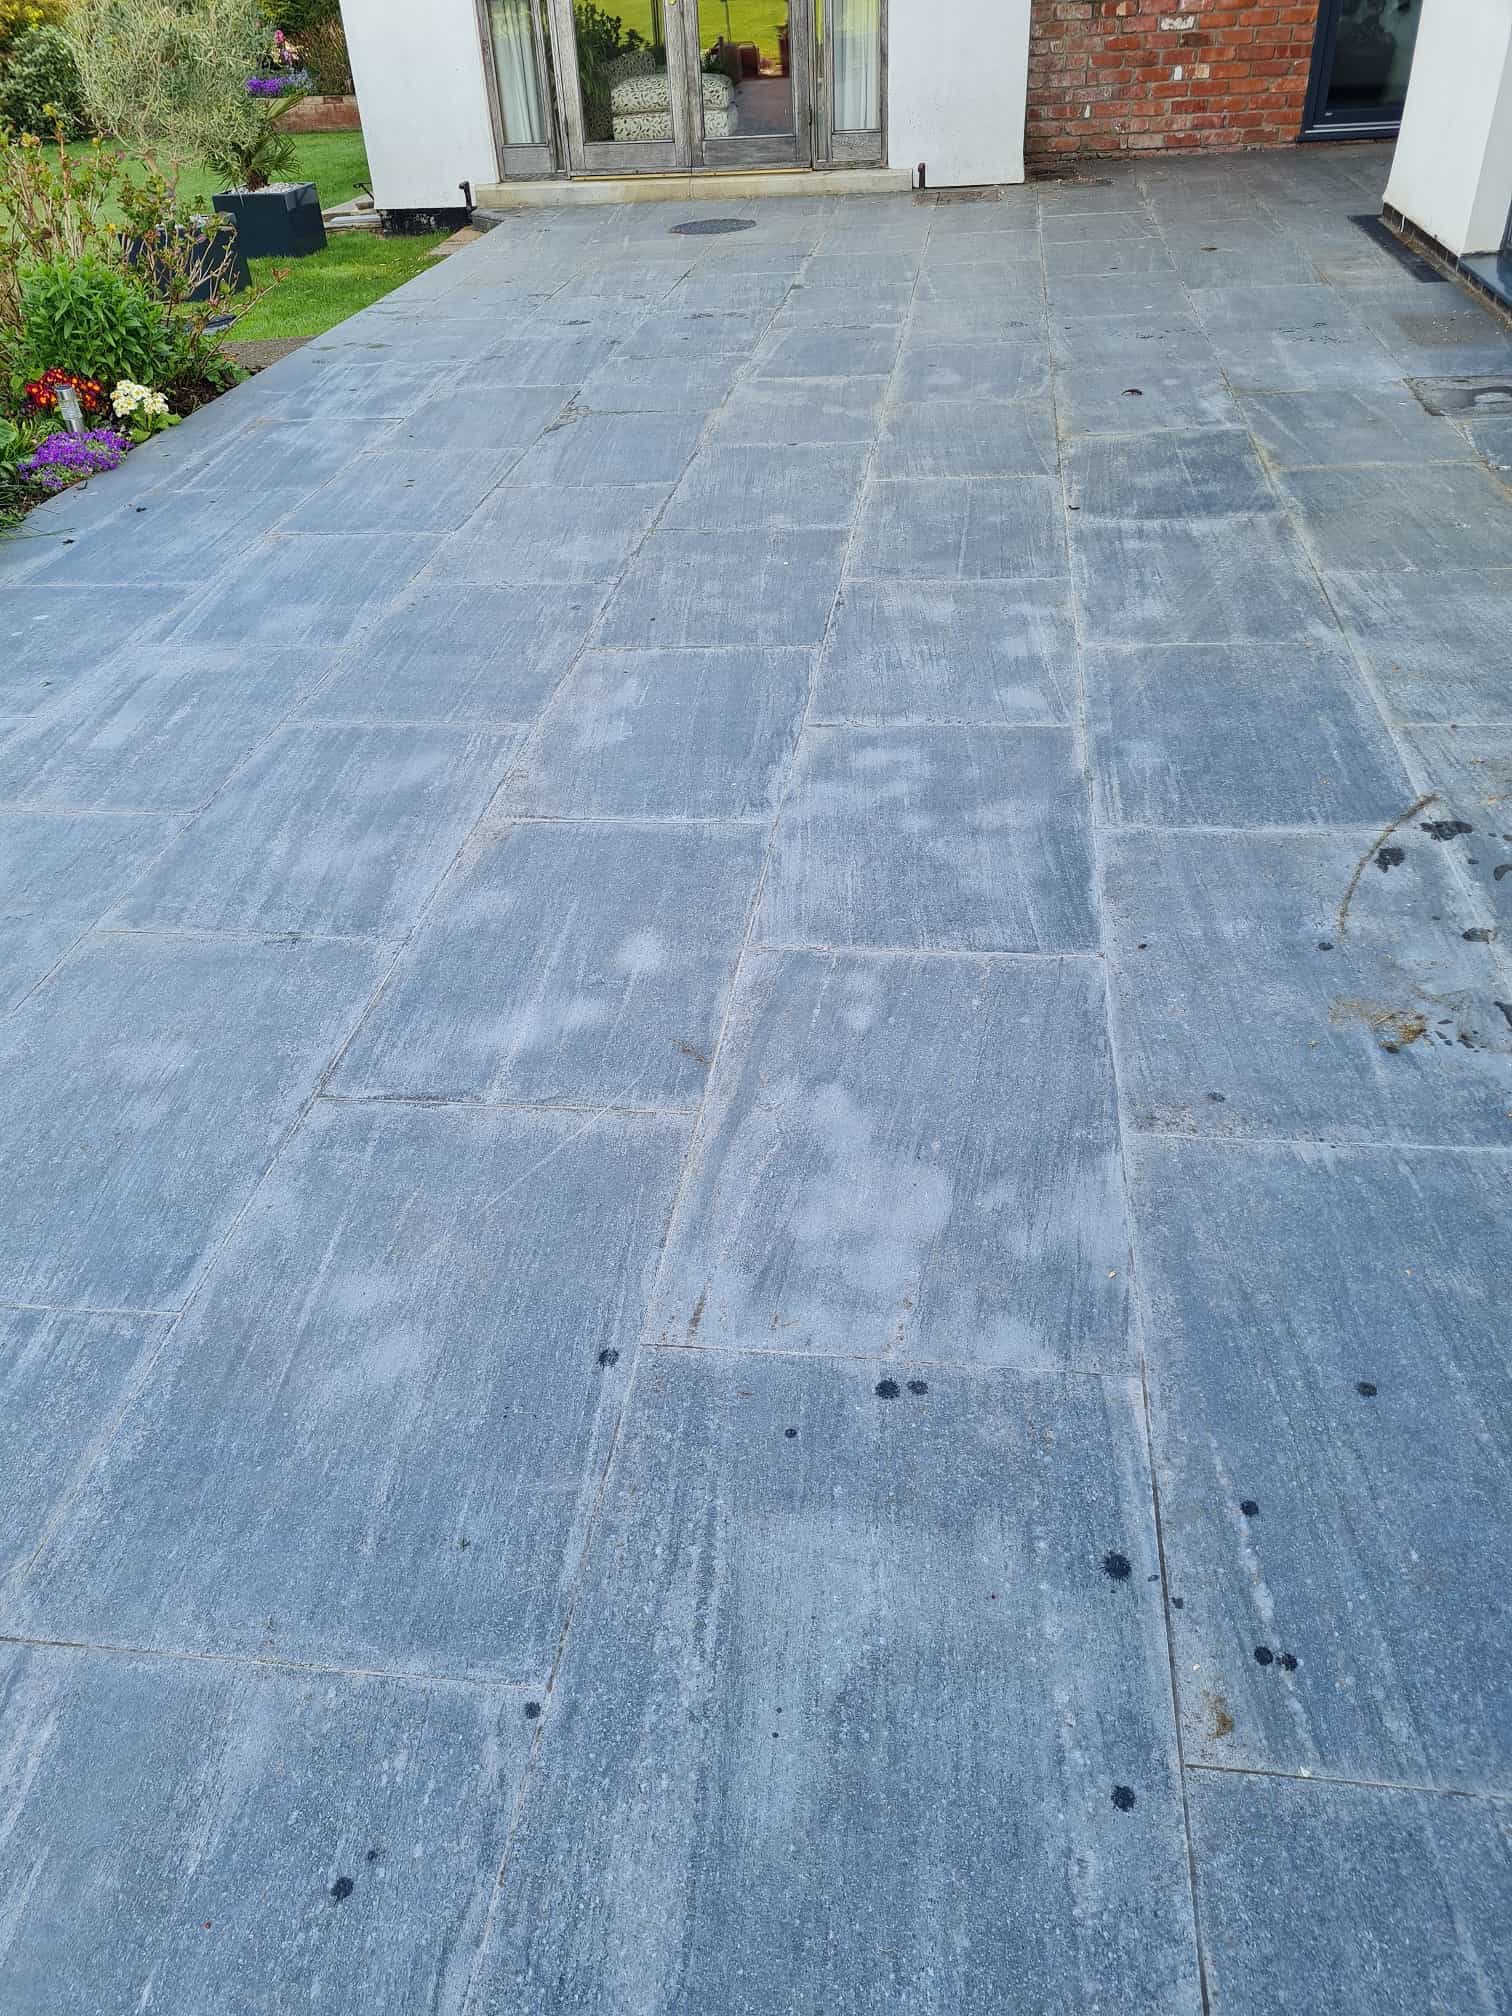
A homeowner from Ainsdale was in touch recently regarding the Limestone floor in their hallway which needed attention. The floor had been laid six years prior and over that time its appearance had degraded significantly losing its colour and almost turning white in places.

Limestone Floor Ainsdale Before Cleaning Polishing

I visited the property to survey the floor and it was clear to me that the original sealer and polish had long since worn off. Additionally, I suspect they may have been using the wrong product to clean the floor with.

I recommended giving the floor a deep clean to remove ingrained dirt and what was left of the original sealer and then polishing the stone with burnishing pads to bring up the appearance of the stone and then finishing with the application of a protective sealer. Happy with my quote a date was set for the work to start.

Cleaning and Polishing a Limestone Tiled Floor

On arrival the first step was to give the floor a general clean with a focus on cleaning the grout lines and removing any grit from the floor. I used a 1:4 dilution of Tile Doctor Pro-Clean which is an alkaline tile cleaning product that is safe to use on grout and stone. The cleaning solution was applied by sponge mop and left to soak in for fifteen minutes before being scrubbed in along the grout line using a stiff narrow brush to get them really clean. Once done the floor was then rinsed with clean water and the now soiled cleaning solution removed with a wet vacuum.

The next step was to use a set of Tile Doctor burnishing pads to polish the stone back to a deep shine. The pads which are encrusted with industrial diamonds are applied with a rotary floor buffer in sequence from coarse to extra fine. The first pad has a Coarse 400 grit which is applied with only water for lubrication, removes minor scratches, sealers, and the top surface dirt. Working in small areas, I applied the pad across the Limestone, rinsing in between and picking up the soiled solution with a wet-vac machine. I then repeated this same procedure with the Medium 800 grit pad which is the first stage polishing pad again rinsing with water after use. The next two pads are a Fine 1500 grit and Extra Fine 3,000 grit which really build up a high-quality polish on the stone.

Sealing a Polished Limestone Tiled Floor

The floor was left to dry off fully overnight and I returned the next day to seal the Limestone first checking with a damp meter that the stone was dry. The Limestone had some lovely brown colours so I had recommended we use Tile Doctor Colour Grow to seal the floor as this brings out the colour and it certainly didn’t disappoint. This sealer is an impregnating sealer that works under the surface by occupying the pores in the stone thus preventing dirt from becoming ingrained there. This ensures dirt remains on the surface where it can be easily removed with regular cleaning.

Limestone Floor Ainsdale After Cleaning Polishing

A couple of floor fans were used to help speed up the drying process and after about an hour the floor gently buffed with a White pad to bring up the shine even further. Once complete the floor looked amazing.

For the aftercare cleaning of a polished stone floor like this we recommend using Tile Doctor Stone Soap. It’s a gentle yet effective cleaner that helps maintain the patina and won’t damage the sealer ensuring it lasts a long time.


Professional Limestone Floor Polishing in Merseyside

Polishing a Limestone Hallway Floor in Ainsdale Read More »

Multiple Georgian Terrazzo Floors Renovated St Helens

Multiple Georgian Terrazzo Hallway Floors Renovated in St. Helens

We were contacted by the owner of a large Georgian property in St Helens to clean, polish and seal multiple Terrazzo floors. Its very difficult to quote a price for such an old floor over the phone as the photographs don’t reveal all the problems, so I arranged a mutually convenient time for to pop over a conduct a survey first.

Typically floors of this type need to be sealed to keep the dirt from getting into the pores of the stone, however sealers wear off over time, especially in a hallway so every few years they need to deep cleaned and re-sealed.

Whilst at the property I discovered that the house was originally built for a manager at the nearby Pilkington Glass company. Four different Terrazzo floors has been installed which ran through the ground floor of the house, the small grey floor was the entrance porch that led onto the main orange hallway that then led onto the Kitchen.

Terrazzo Floor Before Renovation St Helens

Terrazzo is made from thousands of pieces of crushed stone including marble and laid as single slab so any movement in the base can lead to cracks which have to be sympathetically filled. Structurally this floor was solid with only a few cracks that needed repair, other than that it was simply dirty and needed a deep clean and polish to bring up its appearance.

Deep Cleaning a Terrazzo Tiled Hallway Floor

To renovate the Terrazzo, I decided to cut the floor back using a 200-grit diamond encrusted burnishing pad to get the scratches out of the floor. The pad fit to a rotary floor buffing machine which is heavily weighted to improve contact with the floor. The coarse pad breaks out the deepest stains, removing dirt and old sealers and each pad is passed over each part of the floor four times. Water is used to lubricate the process and it isn’t long before this turns into a dark slurry. Once done the floor is rinsed with a little more water and the slurry extracted with a wet vacuum.

Terrazzo Floor During Renovation St Helens

After the initial clean I moved onto repairing the cracks which is these where filled in using cement and stone-coloured chippings blended to closely matched the colours in the floor. Once set the excess was ground down using the 200-grit pad until the repair successfully merged in with the surrounding floor.

Terrazzo Floor After Repair St Helens

The next step was to burnish the Terrazzo using a set of finer grit burnishing pads to slowly bring up the polished appearance of the stone. This starts with a 400-grit pad and moves up to a 1500-grit pad, again rinsing and extracting after each pad has been applied to the floor. After a final rinse and extract with the wet vacuum the floor was left to dry out overnight.

Sealing a Terrazzo Tiled Hallway Floor

The next day the last pad in set of burnishing pads sequence which is a 3000-grit pad was applied to the floor dry with only a little water sprayed onto to the floor. This pad really brings up the polished appearance and adds a subtle satin shine to the Terrazzo.

The last pad also leaves the floor dry and ready for sealing for which I had selected Tile Doctor Colour Grow which not only seals the floor but enhances the colours of the stone segments to achieve a beautiful result. Colour Grow is also breathable which means it will allow moisture to rise through the floor, this is an important consideration when dealing with 200-year-old floors which will not have the benefit of a damp proof membrane underneath.

Terrazzo Floor After Renovation St Helens

Once done the floor looked cleaner, lighter and all the little characterful motifs, patterns and orange borders designed into the floors really stood out. My customer was over the moon with the improvement and has taken advantage of our maintenance plan service and asked us to pop back every six months to do a quick re-polish of the floors and top up the sealer.

Terrazzo Floor After Renovation St Helens

For aftercare cleaning I’ve advised the use of Tile Doctor Stone Soap, this is a mild but effective floor cleaner that’s designed for polished floors and will help maintain the patina.


Professional Restoration of a Terrazzo Tiled Hallway in Merseyside

Multiple Georgian Terrazzo Hallway Floors Renovated in St. Helens Read More »

Marble Floor Tile Polishing Thornton

Cleaning and Restoring the Polish on a Marble Tiled Floor in Thornton

A client in the Merseyside village of Thornton asked me to come over to see what could be done about their Marble tiled floor which ran from the hallway into the kitchen and dining room. Over the years the Marble had lost its polished appearance which is not uncommon with polished stone as the shine does wear down with use.

Marble Floor Tiles Before Cleaning Thornton

It’s worth mentioning at this point that Tile Doctor offer a maintenance plan for owners of these types of floors whereby we pop in once a year for a few hours to bring up the polish on the floor and top up the sealer. Before I could offer that option though the floor needed to be stripped back, burnished and re-sealed.

Marble Floor Tiles Before Cleaning Thornton

Cleaning a Marble Polished Tiled Kitchen and Hallway Floor in Thornton

To start I gave the floor a wash with Tile Doctor Pro-Clean which was left to soak into the tile and grout for ten minutes before scrubbing it in with a black pad fitted to a rotary floor machine. Then a little water was added to the floor and the grout lines scrubbed by hand using a stiff brush. The dirt was then removed with a wet vacuum.

Marble Hallway Tiles During Cleaning Thornton

The next job was to add extra weight to the floor machine to improve contact with the Marble tiles during the next process of burnishing which involves the application of a set of diamond pads of increasingly finer grits. The first burnishing pad used was a 400-grit which removes light scratches and old sealers; water is used for lubrication and the pad is run over each of the tiles four times making sure to cover the full tile. Once done the floor is then rinsed off with water and the soiling generated is extracted with a wet vacuum.

This process is then repeated with a finer 800-grit pad and then a 1500-grit pad which further brings up the polish on the tile. The floor was rinsed and dried by wet vacuum and then left to dry off completely overnight.

Sealing Marble Polished Tiled Kitchen and Hallway Floor

The next day I applied the last Tile Doctor Burnishing Pad which is a very fine 3000-grit pad, this time applied with only a spray of water which is a process we refer to as a spray burnish. This last pad builds on the polished appearance of the marble really bringing up the shine.

The final step was to seal the Marble floor using several coats of Tile Doctor Colour Grow which is an impregnating sealer that protects the tiles and improves colour. Once dry the floor was given a buff with a White buffing pad leaving a deep shine to the floor.

Marble Floor Tiles After Burnishing Thornton

Once complete the floor looked fantastic, the grout was much cleaner and the Marble had a deep shine you could see your reflection in. The client was delighted with the outcome and I’ve made a note to get in touch with them next year about a maintenance visit. In the meantime, I’ve recommended they clean the floor with Tile Doctor Stone Soap which is ideal for maintaining the patina on polished stone floors.


Professional Restoration of a Polished Marble Tiled Hallway and Kitchen in Merseyside

Cleaning and Restoring the Polish on a Marble Tiled Floor in Thornton Read More »

Granite Patio Renovated in Mawdesley Ormskirk

Removing Cement Residue from an Amazing Granite Patio in Mawdesley

We were contacted by a business owner in Mawdesley near Ormskirk who had recently had a large Granite Patio installed. Unfortunately, the installer had left the patio covered in cement grouting stains and residue and as you can imagine he was not happy about it.

Granite Patio Before Renovation Mawdesley Ormskirk

This is something we often get asked to resolve and you may here it referred to as Hazing or Smearing. The solution depends on the surface material and can normally be removed using an acidic cleaner such as Tile Doctor Grout Clean-up or Acid Gel. However, in this case the surface of the stone looked really dull and marked with lines and what appeared to be boot marks. I decided the best solution would be to use a set of diamond pads to grind off the top layer of stone to reveal a new surface and then to polish it.

Granite Patio Before Renovation Mawdesley Ormskirk

Resurfacing a Large Granite Patio in Mawdesley

To resurface the Granite, I used a weighted buffing machine and a set of coarse stone resurfacing pads. The extra weight was needed to ensure a good contact with the stone and the process commenced with a very coarse 100 grit pad to remove the damage using only water for lubrication.

The pad was run each Granite slab around three times generating a lot of residues in the process. A wet vacuum was used to remove the residue and with it being such a large patio it took some time before that was completed and we could move onto the next pad.

Granite Patio During Renovation Mawdesley Ormskirk

Once done the process was repeated with a 200-grit to renovate the surface after using the coarse pad. Again, only water was used and the whole area was rinsed and extracted to remove the residue. This action removed all the damaged surface material and was followed by the application of a very fine 3000-grit burnishing pad to give the patio a nice sheen.

Sealing a Large Granite Patio in Mawdesley

Fortunately, I had picked a good window in which to do the work (thanks to the BBC and Carol Kirkwood) and the weather remained dry. This was important as I was able to return the next day and prepare the Granite for sealing.

First, I applied a product called Tile Doctor Stone Oil to the Granite, this seeps into the pores of the stone giving it a rich dark colour improving the overall appearance and integrity. This was then locked in with an application of sealer which for this patio I used Tile Doctor Colour Grow. There are a few reasons I chose this product including the fact that its breathable which is important when dealing with external stone and it contains a colour enhancer which brings out the natural colours in the Granite.

Granite Patio After Renovation Mawdesley Ormskirk Granite Patio After Renovation Mawdesley Ormskirk

My client was very impressed with the transformation and relieved we had managed to put the life back in what was a very expensive patio. I’m please to say we subsequently asked to work on two more patios and different stone floors at the same property.

Granite Patio After Renovation Mawdesley Ormskirk


High Quality Transformation of a Large Granite Patio Near Ormskirk

Removing Cement Residue from an Amazing Granite Patio in Mawdesley Read More »

Quarry Tiled Basement Hallway Floor Renovated St Michaels Hamlet Liverpool

Old Vicarage Basement Flooring Renovated in St Michaels Hamlet Liverpool

The pictures below come from the basement of an old Vicarage in St Michaels Hamlet, Liverpool where there was a mixture of tiling including Quarry, Marble, and Sandstone. The current owner had bought the rather magnificent property 35 years ago and caried out various modernisations but had never touched the floors in the basement kitchen.

Built near the church of the same name, St Michaels Hamlet is a suburb of Liverpool close to the banks of the river Mersey. Back in the day the area was popular with wealthy shipping magnates and resulted in large Victorian mansions being constructed.

Quarry Tiled Basement Floor Before Cleaning St Michaels Hamlet Liverpool Quarry and Yorkstone Tiled Basement Floor Before Cleaning St Michaels Hamlet Liverpool

The Red and Black Quarry tiles in the Kitchen were the main concern but there was also a section of Marble tiles and a small section of Yorkstone which had seen better days. I proposed milling the Yorkstone to reveal a fresh surface, but the owner only wanted the stone cleaned and sealed so its many faults and marks would highlight its history.

Deep Cleaning Basement Quarry Tiles in St Michaels Hamlet

The process I used to clean the Quarry, Yorkstone and Marble tiles was the same and involved spraying the floor with a 1:4 dilution of Tile Doctor Pro Clean and leaving it to soak in. Pro-Clean is an alkaline degreaser and stripper and is our go to product for cleaning Tile and Grout.

Marble Tiled Basement Floor During Cleaning St Michaels Hamlet Liverpool

After ten minutes the product has had time to break down the dirt in the pores of the tile and is then scrubbed in with a rotary brush fitted to a buffing machine running at slow speed. Water is added during the process to add lubrication and the whole floor is rinsed water at the end and the residue extracted with a wet vacuum.

With several floors to clean I split the work up and was able to inspect and re-apply the treatment where needed to ensure all the stubborn staining was removed. Once satisfied they were as clean as they could the floors were given a final rinse to remove any trace of cleaning product and then left to dry out overnight, assisted with a few heaters to help the drying process.

Sealing a Quarry, Yorkstone and Marble Tiled Basement Floor

The next day we took several moisture readings with a damp meter to make sure the floor was ready to seal. The heaters had done their job and readings were all good, had that not been the case I would have had come back another day to seal the floor, we don’t recommend applying a sealer to a damp floor as you won’t get the best result.

Having discussed the properties of different sealers with the owner previous Tile Doctor Colour Grow had been selected. It’s an impregnating sealer that soaks into the pores of the tile improving colour and adding protection from within. As well as enhancing colour it’s also a fully breathable so it will cope with any moisture under the floor allowing it to rise through the tile and evaporate at the surface. This is an important property when choosing a sealer for old floors like these which won’t have the benefit of a modern damp proof membrane.

Once done the Red and Black Quarry tiled floor looked much cleaner and lighter with the contrasting colours really shining through. The appearance of the Yorkstone and Marble floor was also improved. It never fails to impress me the transformation that can be achieved when it comes to cleaning old tiles.

Quarry and Yorkstone Basement Floor After Renovaiton St Michaels Hamlet Liverpool

My client was very satisfied with the work we carried out and left the following feedback for us which is always appreciated.

“This father and son team were super-professional and know exactly what they are doing. What was impressive was how they moved all the furniture with great care. Absolutely prompt in the mornings, and the results are amazing.
Paul G – Liverpool”

For aftercare cleaning I recommended Tile Doctor Neutral Cleaner, it’s a mild cleaning product that’s pH neutral and compatible for use on sealed surfaces.

Quarry Basement Floor After Renovaiton St Michaels Hamlet Liverpool


Professional Renovation of a Quarry, Yorkstone and Marble Tiled Basement Floor in Merseyside

Old Vicarage Basement Flooring Renovated in St Michaels Hamlet Liverpool Read More »

Scroll to Top