Stone Soap

Limestone Hallway Floor Polishing Ainsdale

Polishing a Limestone Hallway Floor in Ainsdale

A homeowner from Ainsdale was in touch recently regarding the Limestone floor in their hallway which needed attention. The floor had been laid six years prior and over that time its appearance had degraded significantly losing its colour and almost turning white in places.

Limestone Floor Ainsdale Before Cleaning Polishing

I visited the property to survey the floor and it was clear to me that the original sealer and polish had long since worn off. Additionally, I suspect they may have been using the wrong product to clean the floor with.

I recommended giving the floor a deep clean to remove ingrained dirt and what was left of the original sealer and then polishing the stone with burnishing pads to bring up the appearance of the stone and then finishing with the application of a protective sealer. Happy with my quote a date was set for the work to start.

Cleaning and Polishing a Limestone Tiled Floor

On arrival the first step was to give the floor a general clean with a focus on cleaning the grout lines and removing any grit from the floor. I used a 1:4 dilution of Tile Doctor Pro-Clean which is an alkaline tile cleaning product that is safe to use on grout and stone. The cleaning solution was applied by sponge mop and left to soak in for fifteen minutes before being scrubbed in along the grout line using a stiff narrow brush to get them really clean. Once done the floor was then rinsed with clean water and the now soiled cleaning solution removed with a wet vacuum.

The next step was to use a set of Tile Doctor burnishing pads to polish the stone back to a deep shine. The pads which are encrusted with industrial diamonds are applied with a rotary floor buffer in sequence from coarse to extra fine. The first pad has a Coarse 400 grit which is applied with only water for lubrication, removes minor scratches, sealers, and the top surface dirt. Working in small areas, I applied the pad across the Limestone, rinsing in between and picking up the soiled solution with a wet-vac machine. I then repeated this same procedure with the Medium 800 grit pad which is the first stage polishing pad again rinsing with water after use. The next two pads are a Fine 1500 grit and Extra Fine 3,000 grit which really build up a high-quality polish on the stone.

Sealing a Polished Limestone Tiled Floor

The floor was left to dry off fully overnight and I returned the next day to seal the Limestone first checking with a damp meter that the stone was dry. The Limestone had some lovely brown colours so I had recommended we use Tile Doctor Colour Grow to seal the floor as this brings out the colour and it certainly didn’t disappoint. This sealer is an impregnating sealer that works under the surface by occupying the pores in the stone thus preventing dirt from becoming ingrained there. This ensures dirt remains on the surface where it can be easily removed with regular cleaning.

Limestone Floor Ainsdale After Cleaning Polishing

A couple of floor fans were used to help speed up the drying process and after about an hour the floor gently buffed with a White pad to bring up the shine even further. Once complete the floor looked amazing.

For the aftercare cleaning of a polished stone floor like this we recommend using Tile Doctor Stone Soap. It’s a gentle yet effective cleaner that helps maintain the patina and won’t damage the sealer ensuring it lasts a long time.


Professional Limestone Floor Polishing in Merseyside

Polishing a Limestone Hallway Floor in Ainsdale Read More »

Multiple Georgian Terrazzo Floors Renovated St Helens

Multiple Georgian Terrazzo Hallway Floors Renovated in St. Helens

We were contacted by the owner of a large Georgian property in St Helens to clean, polish and seal multiple Terrazzo floors. Its very difficult to quote a price for such an old floor over the phone as the photographs don’t reveal all the problems, so I arranged a mutually convenient time for to pop over a conduct a survey first.

Typically floors of this type need to be sealed to keep the dirt from getting into the pores of the stone, however sealers wear off over time, especially in a hallway so every few years they need to deep cleaned and re-sealed.

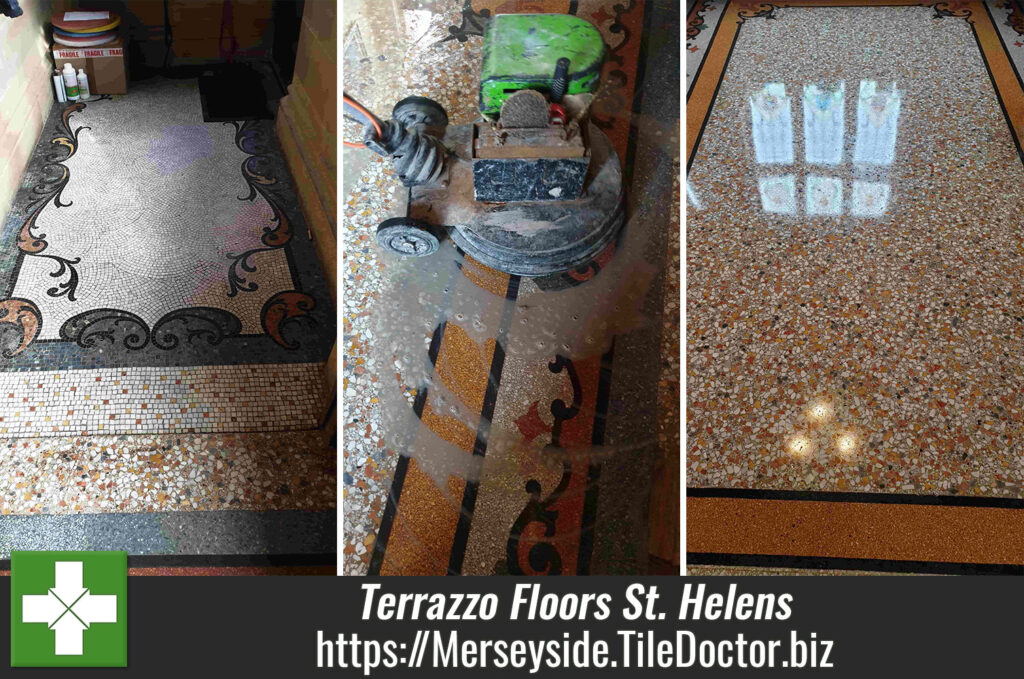
Whilst at the property I discovered that the house was originally built for a manager at the nearby Pilkington Glass company. Four different Terrazzo floors has been installed which ran through the ground floor of the house, the small grey floor was the entrance porch that led onto the main orange hallway that then led onto the Kitchen.

Terrazzo Floor Before Renovation St Helens

Terrazzo is made from thousands of pieces of crushed stone including marble and laid as single slab so any movement in the base can lead to cracks which have to be sympathetically filled. Structurally this floor was solid with only a few cracks that needed repair, other than that it was simply dirty and needed a deep clean and polish to bring up its appearance.

Deep Cleaning a Terrazzo Tiled Hallway Floor

To renovate the Terrazzo, I decided to cut the floor back using a 200-grit diamond encrusted burnishing pad to get the scratches out of the floor. The pad fit to a rotary floor buffing machine which is heavily weighted to improve contact with the floor. The coarse pad breaks out the deepest stains, removing dirt and old sealers and each pad is passed over each part of the floor four times. Water is used to lubricate the process and it isn’t long before this turns into a dark slurry. Once done the floor is rinsed with a little more water and the slurry extracted with a wet vacuum.

Terrazzo Floor During Renovation St Helens

After the initial clean I moved onto repairing the cracks which is these where filled in using cement and stone-coloured chippings blended to closely matched the colours in the floor. Once set the excess was ground down using the 200-grit pad until the repair successfully merged in with the surrounding floor.

Terrazzo Floor After Repair St Helens

The next step was to burnish the Terrazzo using a set of finer grit burnishing pads to slowly bring up the polished appearance of the stone. This starts with a 400-grit pad and moves up to a 1500-grit pad, again rinsing and extracting after each pad has been applied to the floor. After a final rinse and extract with the wet vacuum the floor was left to dry out overnight.

Sealing a Terrazzo Tiled Hallway Floor

The next day the last pad in set of burnishing pads sequence which is a 3000-grit pad was applied to the floor dry with only a little water sprayed onto to the floor. This pad really brings up the polished appearance and adds a subtle satin shine to the Terrazzo.

The last pad also leaves the floor dry and ready for sealing for which I had selected Tile Doctor Colour Grow which not only seals the floor but enhances the colours of the stone segments to achieve a beautiful result. Colour Grow is also breathable which means it will allow moisture to rise through the floor, this is an important consideration when dealing with 200-year-old floors which will not have the benefit of a damp proof membrane underneath.

Terrazzo Floor After Renovation St Helens

Once done the floor looked cleaner, lighter and all the little characterful motifs, patterns and orange borders designed into the floors really stood out. My customer was over the moon with the improvement and has taken advantage of our maintenance plan service and asked us to pop back every six months to do a quick re-polish of the floors and top up the sealer.

Terrazzo Floor After Renovation St Helens

For aftercare cleaning I’ve advised the use of Tile Doctor Stone Soap, this is a mild but effective floor cleaner that’s designed for polished floors and will help maintain the patina.


Professional Restoration of a Terrazzo Tiled Hallway in Merseyside

Multiple Georgian Terrazzo Hallway Floors Renovated in St. Helens Read More »

Scroll to Top